How To Play Guitar
15 Steps on How To Be A Better Guitarist
Follow this simple guide and in a few steps you'll learn how to play guitar. We've set this guide up in a step-by-step format, so all you need to do is follow along. Grab your guitar and let's go!
Step 1 - Get to Know Your Guitar
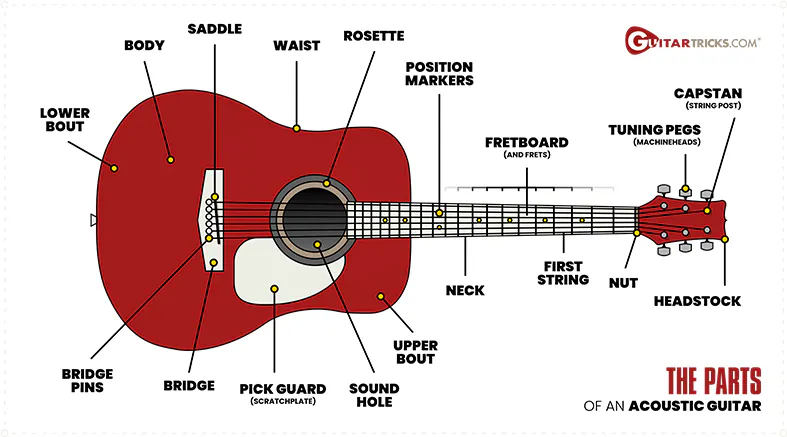
Parts Of A Guitar Diagram
A guitar is a beautiful thing. Let's check out how it's put together. A guitar has several essential parts:
- the headstock (where the tuning pegs are located)
- the neck (with the fretboard on top)
- the body (where the sound resonates)
- the strings (usually six of them, though there are variations)
Understanding these parts isn't just to impress your friends; knowing this helps you figure out what goes where and why it matters.
You'll understand what notes are the guitar strings (Low E, A, D, G, B, High E) and one of the most practical aspects of the guitar, how to change guitar strings.
Here's a basic overview of how it all works together:
- The strings are inserted into the bridge and stretched over the sound hole towards the headstock, across the length of the fretboard and through the tuning pegs.
- The tuning pegs are then turned to bring the strings to tension. This dials in the pitch of the strings; how to tune a guitar.
- Set the guitar upright, resting on your thigh, across your belly with the neck pointing to the left of you.
- With your right hand, strum the strings across the sound hole.
- Use your left hand to finger chords and melodies.
Pro Tip: Get a setup.
Have a guitar tech (luthier) fix your intonation (tuning throughout the length of the guitar) and the action (the string height from the fretboard).
If these are off, the guitar might not stay in tune no matter what you do making learning how to play more difficult.
Step 2 - Posture and Handling – How to Hold the Guitar
Let's face it, if you're not holding the guitar right, you won't play right.
Placing it on your lap, angling the neck, listening to your body if things don't feel right, this is all part of your beginner guitar lessons.
The key to knowing how to hold a guitar is good posture.
You know you have bad posture when:
- You hunch over or strain your arms to reach the strings.
- Your hands and arms aren't able to reach the sound hole and the lowest frets on the neck with ease.
- Your back or arms/wrists get sore quickly when playing.
If you want to stand while playing, adjust your guitar strap to make playing easier (usually a little higher up your belly and chest).
Don't adjust your body to be able to play the guitar.
Typically you'll begin learning how to play guitar with a guitar pick for strumming notes and chords.
Here's how to hold a guitar pick - Hold the pick between your thumb and index finger with pressure, but not stiff, which could lead to strain.
Before we move to chords, let's make your first sounds:
- Strum all the strings without pressing down on any strings on the fretboard. This is called "open" position, since the string is ringing out without any muting or fretting.
- Place your left-hand index finger on the lowest string between any 2 frets on the fretboard - press down firmly.
- Use your right-hand pick at the sound hole to pluck the corresponding string.
Congratulations, you're technically already playing the guitar!
Now let's start playing music.
Step 3 - Basic Guitar Chords – Easy Open Chords
The best place to start when learning how to play on the guitar for beginners is with chords.
Basic open chords are the building blocks of all modern music.
Once you know just a few of these guitar chords you'll be able to play hundreds of songs.
Here are the first open chords you should learn:
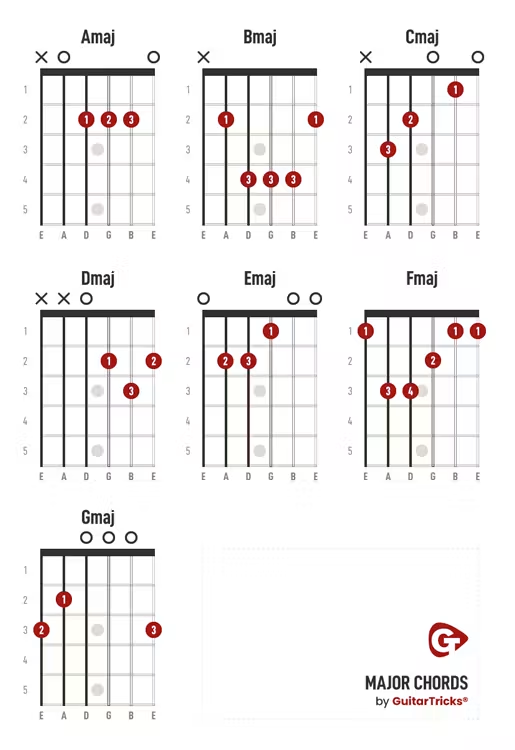
How to use this chart:
- The diagram you're looking at is designed as if you are looking directly onto the lowest few frets of the fretboard.Notice the chord name at the top of each diagram.
- The numbers to the left are the first-fifth frets. The X's and O's at the top indicate if you should mute the string (X) or let the string ring open (O). The letters on the bottom indicate the corresponding string names – E, A, D, G, B, E.
- The red circles have numbers indicating which finger on your left hand you should use to press
down the corresponding string.
1 = index
2 = middle
3 = ring
4 = pinky
- Try the easiest chord on the list; E major. Place your index finger on the first fret of the G string. Place your middle finger on the second fret A string. Place your ring finger on the second fret D string.
- Press all strings down firmly and STRUM!
Nice work! This is a huge step.
If the chord doesn't ring out, or you hear buzzing or muted strings, this is normal for first-timers.
Don't fret (get it!), simply keep trying - repetition is key.
Practice transitioning from one chord to another, focusing on finger placement.
The point is to get these shapes in your hands and in your head.
Start with downstrokes (strum all of the strings from low to high in one motion).
Strum each chord four times, then switch to the next chord.
It's okay if it's a bit clunky at first—everyone starts here.
You might find that some chord shapes are harder than others (I'm looking at you, B major) so stick with what's working and gradually add new shapes to your practice.
Pro Tip: have fun!
Knowing chords will take you very far in learning how to play guitar.
They're also super fun once you get the hang of them.
Finding ways to have fun while learning will keep you motivated.
Enjoying the process is key, since learning how to play guitar can be difficult, even frustrating at times.
Bonus Tip: My fingers hurt!
Chord practice is a great way to start building guitar calluses on your fingers.
Callus building is a big pain point for anyone learning how to play guitar.
Go for as long as you can handle, but don't overdo it.
Step 4 - Learn A 3 Chord Song
Learning easy guitar songs right away may seem a bit ambitious, but trust me, it's one of the best ways to keep yourself motivated.
Choose a simple 3 chord song to get started.
Here's a great list of 3 chords songs to start learning today:
“Let It Be” – The Beatles
“Smoke On The Water” – Deep Purple
“Sweet Home Chicago” – Eric
Clapton
“Honky Tonk Woman” – The Rolling
Stones
“Perfect” – Ed Sheeran
“Hey Joe” – Jimi Hendrix
“Highway To Hell” – AC/DC
“My Immortal” - Evanescence
Starting with simple songs like these is great because you can focus less on the technical aspects of learning how to play guitar and more on the music and having fun!
Playing a real song will also help you understand how chords fit together in a musical context.
All those chords work together, and knowing how this which will help you understand how to play guitar in general.
Learning songs early on, and continuing to learn songs will boost your confidence.
Pro Tip: Keep a journal of the songs you know/are learning.
This will help keep you motivated – look at all the songs you know how to play!
Guitar Tricks has a great section of 'Made Easy' songs you will be able to pick up right away knowing only basic chords.
Step 5 - The Two Most Important Scales
To really know how to play guitar you'll need to be able to play two scales:
Firstly, the Pentatonic Scale is so widely used in guitar playing that, if you don't take some time to learn it, you'll be seriously lacking in your guitar skills.
And it's only 5 notes!
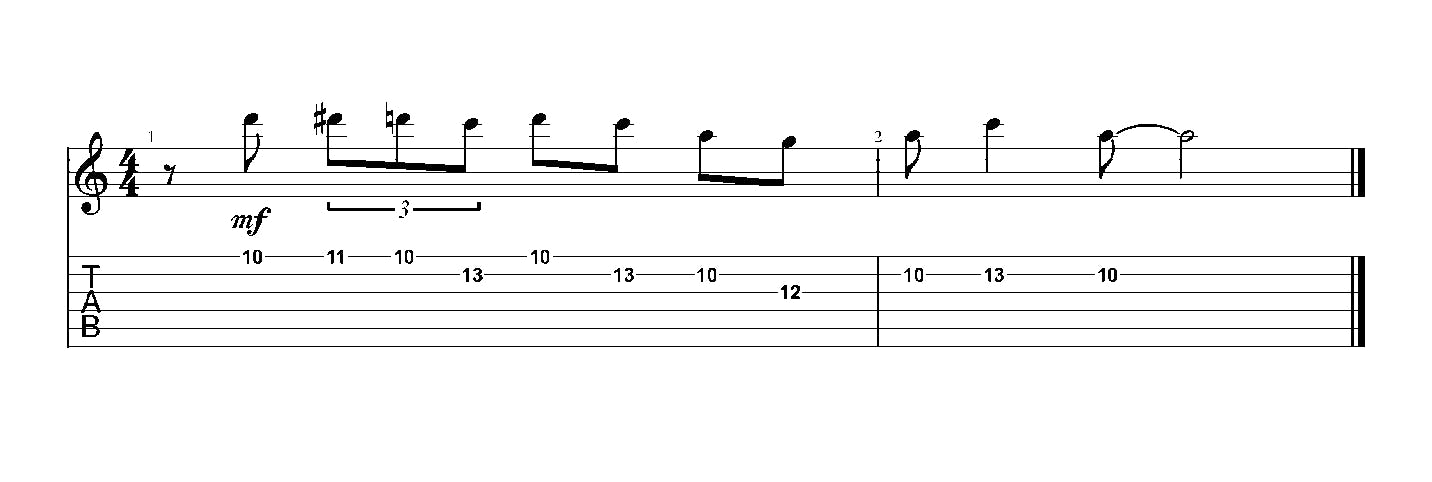
Here's the #1 scale you need to start practicing right now:
A Minor Pentatonic Scale

Let's break this down a bit more so we can understand how it all works.
Take your standard A Minor Scale and let's look at these notes in context of scale degrees:
- A Minor Degrees: 1, 2, b3, 4, 5, b6, b7
- A Minor Notes: A, B, C, D, E, F, G
To build a Pentatonic Scale, simply use the five scale degrees: 1, b3, 4, 5, b7 - A, C, D, E, G.
Now you can take that scale degree formula and insert it over any starting note, which will allow you to play the Pentatonic Scale in different keys.
We'll get into this more later when we talk about soloing.
The Pentatonic scale is the most-used scale in any style of guitar playing.
It can be used in Rock, Country, Blues, Bluegrass, Pop and any other modern style.
The best part about the scale is, when played on its own, it already sounds musical.
You can get through a lot of musical situations knowing this one scale.
But let's take it a step further.
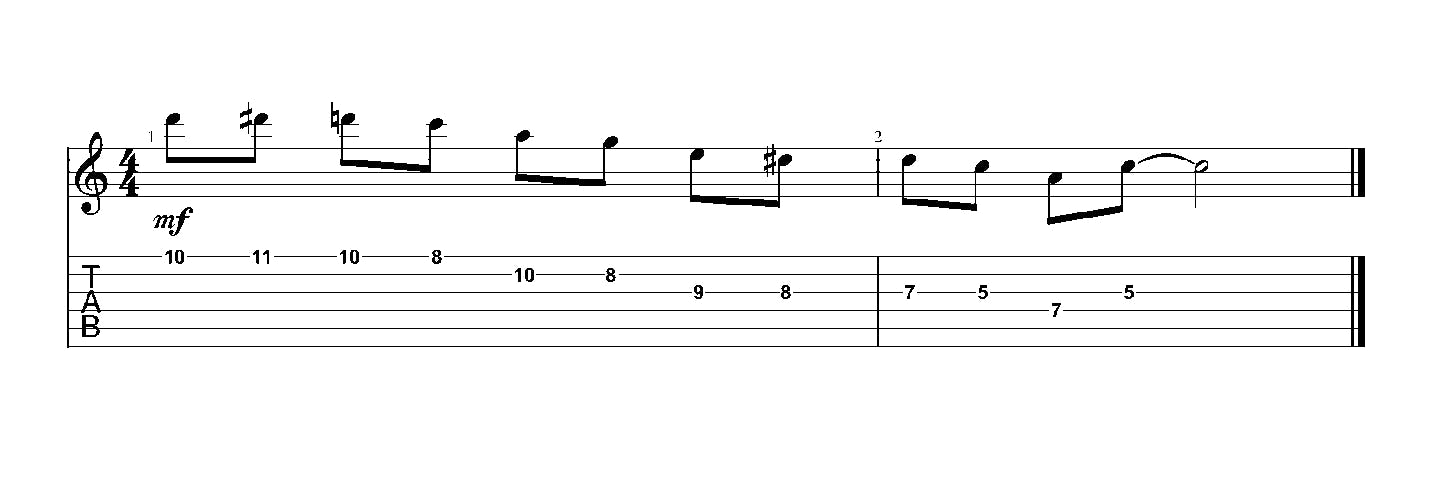
When we add one note to the scale, we get the Blues Scale:
A Blues Scale
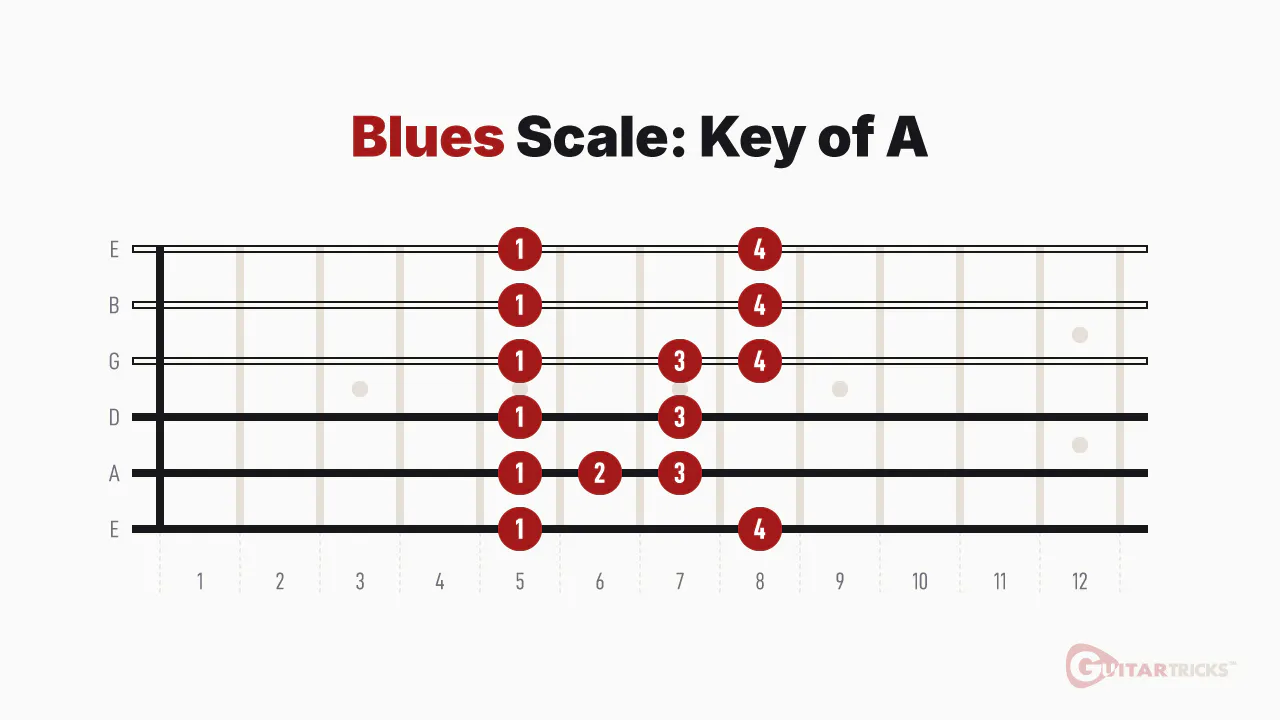
Let's break this down a bit more so we can understand how it all works.
To build a Blues Scale on guitar, simply add a flat 5th scale degree to the Pentatonic Scale pattern between the 4th and 5th degrees:
- Blues Scale Degrees: 1, b3, 4, b5, 5, b7
- Blues Scale Notes: A, C, D, Eb, E, G
By adding the flat 5th scale degree (b5) we get the Blues Scale.
As you can probably hear, this added note creates a "Blusier" vibe; it adds a bit of tension and color to the Pentatonic Scale.
The Blues Scale is the other most widely used scale in all guitar.
Though it tends to be primarily used when playing Bules or Rock music.
That added b5 scale degree makes this scale a bit more specific and slightly less ubiquitous.
Understanding guitar scales isn't something you can fake.
Take the time to practice these.
Scales are what allow guitarists to "play what they feel."
This is where the guitar language comes in; if you know words (scale notes), you can string together phrases and actually say something in your guitar playing.
Step 6 - Practice Routine To Keep You Growing
With everything you've learned so far, now is a great time to develop a simple practice plan.
Keeping a plan and a practice routine will do a lot for you in terms of developing your skills quickly.
The key with a guitar practice routine is consistency.
You'll get a ton more from your guitar learning if you practice a little bit every day rather than doing mega-practice sessions only on the weekends.
Here's a dead-simple practice plan:
- 10 min – Chords. Go over chords you already know, and work on chords you don't yet have down. Don't worry about learning every chord right away. Focus on one at a time, if needed. Work on correctly fingering each chord before you strum the strings. Take your time. Once you have your fingerings down, grab a metronome and work on playing/switching chords in rhythm. Set the metronome to 90bpm, then play 4 or 8 clicks/beats on one chord, then switch to another chord, in time. Focus on making those transitions as smooth as possible.
- 15 min – Songs. Keep a piece of paper or a notebook of the songs you already know, the songs you are currently working on, and the songs you'd like to tackle. Learning songs will also help you learn chords at the same time. Most modern songs can be played with just 3 chords, so you'll be able to play hit songs from early on.
- 5min – Scales. Eat your veggies! Doing regular scale practice, with a metronome, will broaden your understanding of how the guitar works. Don't skip this step, because it will make everything easier as you get into more advanced techniques.
For this practice routine, try setting an alarm on your phone for the time limit described above, then turn your phone face down and simply practice the technique.
I bet you'll want to keep going beyond the time for these sections once you get rolling.
A key element to learning how to play guitar will be to utilize a metronome, always.
I want to emphasize metronome usage at this early stage in the learning process.
Learning to play alongside a metronome and keep the beat is crucial to being able to play guitar.
Pro Tip: Set a goal.
With a goal in mind, your guitar practice will always have purpose and your continued learning will have direction.
This will keep you motivated.
Simple is best when it comes to goal setting – some good examples of goals:
- Switch between all open chords smoothly at a medium speed (metronome bpm).
- Learn a new song every week.
- Learn how to hold a guitar, finger a chord, and strum the notes cleanly.
No matter what your goal is or what level you're at, you'll learn how to play guitar more efficiently if you have something you are working toward.
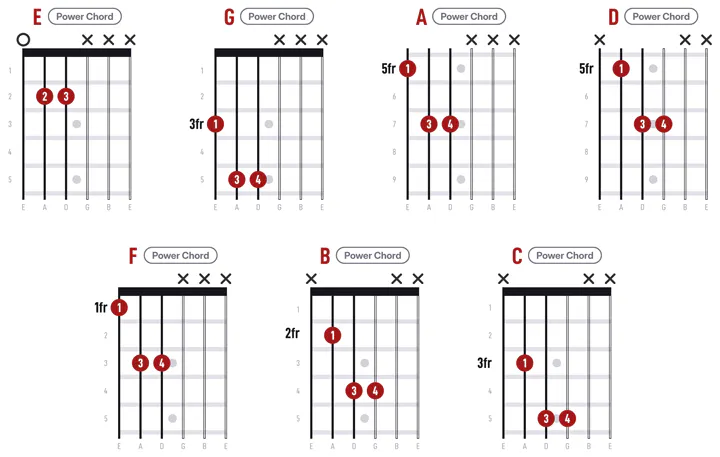
Step 7 - Barre Chords and Power Chords
There are always new chords to learn.
Aside from open chords, the other most important chords to understand are power chords and barre chords.
The best part about these chord shapes is that they can easily be moved around the fretboard.
Power chords are quintessential for rock, especially punk or grunge.
They are simple to finger and make a huge sound since you are repeating the root note at an octave.
They sound massive, therefore powerful!
Here's a basic power chord chart; you should know how to play these guitar chords:
Barre chords are a bit more difficult thank open chords because they require you to barre a finger across multiple strings to make the full shape.
But barre chords allow for more harmony; they include the 3rd along with the doubled-root note and 5th scale degrees.
By including more harmony than a power chord (scale degree notes) you are positioned to make more colorful chords later on.
From the barre chord shape you can create 7th chords, augmented or diminished chords, sus chords and more.
Here's a chord chart showing how to play barre chords:
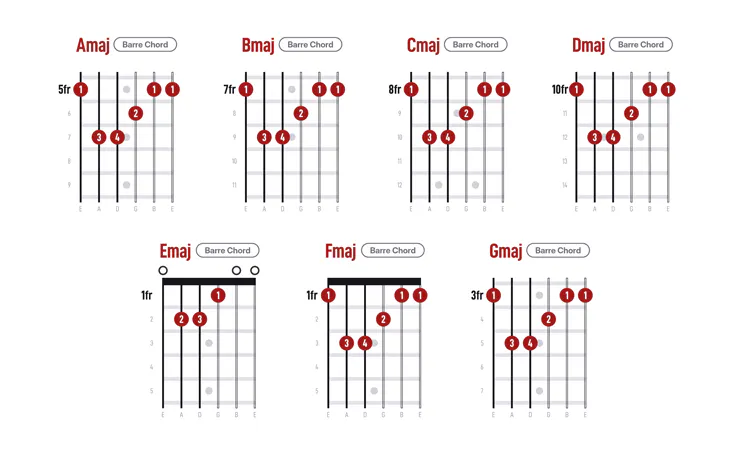
Understanding these two chord types will take your guitar knowledge to the next level.
Not only will you know a new chord shape that can be moved all over the place, you'll be ready to tackle any other more advanced chords down the line.
These two chord types are important to understanding how to play guitar.
Step 8 - Reading Guitar Tabs
Guitar tabs are a simplified notation for guitarists focused on fret numbers and strings instead of standard musical notation and theory.
A lot of beginner guitar lessons are written in tab instead of musical notation, so understanding tablature will take you far when learning how to play guitar.
Chords can be written as tablature, so can melodies and soloing riffs.
By understanding how to read guitar tabs you'll give yourself an advantage in learning how to play guitar.
There are a lot of different symbols to understand, especially when you start reading more complex solos in guitar tab form.
But more often than not you'll simply be reading guitar chords and straightforward melodies in tablature.
Check out this guitar tab legend:
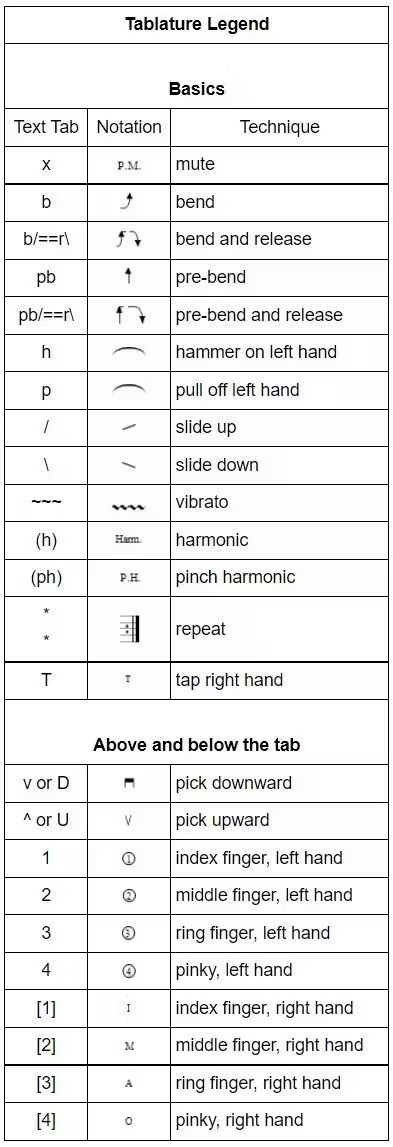
Each lesson and tutorial on Guitar Tricks comes with standard music notation and guitar tabs.
So there are always multiple ways to understand different guitar techniques and concepts.
Sometimes, if you aren't fully understanding an idea, check out the tabs.
It may help connect some dots for you!
Step 9 - Guitar Solos
Most likely you started learning how to play guitar because you saw yourself on stage in front of thousands of screaming fans, taking one of the greatest guitar solos of all time, with lights and pyrotechnics going crazy all around you.
We love that dream for you!
The first step to getting to legend status is learning some guitar licks.
By learning some real-world guitar soloing riffs that true guitar players play, you'll have phrases and language under your fingers that others will be able to understand.
The video above outlines these three Blues licks:
Lick 1
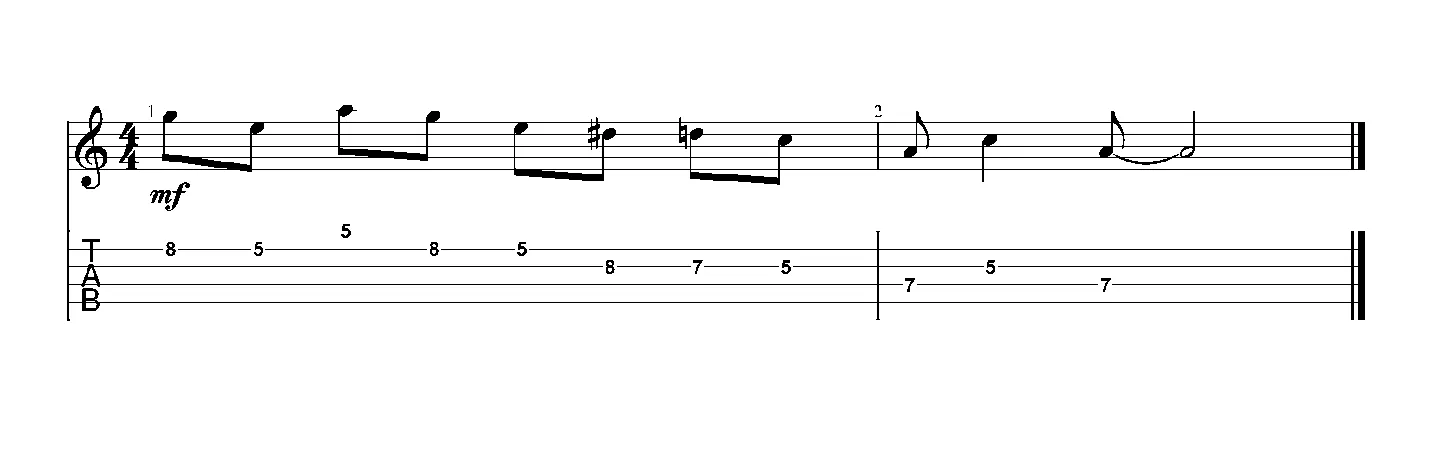
Lick 2
Lick 3
Pro Tip: Know your scales.
All legendary guitar solos and licks are built and created through the practice of guitar scales.
The great thing is, nine times out of ten the scales used will be the Pentatonic Scale or the Blues Scale as we discussed previously.
If you don't know these scales, scroll back up in this article and hit the shed!
If you're looking for a challenge, start learning the modes.
They come in some wacky sounding names like phrygian scale and mixolydian scale.
But modes are where you learn the most interesting aspects of soloing.
With any guitar scale; go slow, work on one at a time, open up a backing track and fiddle around with them to understand the flavor of each one.
Step 10 - Fingerstyle Guitar Basics
One of the most magical aspects of learning how to play guitar is the ability to use different fingers to play different notes/strings.
Either at the same time or to mix them together to create cool patterns.
This is known as fingerstyle guitar or guitar fingerpicking.
It's a great skill for every guitarist to have in their toolkit.
Once you get started with it, you'll be hooked.
Even if you are only looking to rock some power chords, doing simple finger exercises on an interesting chord can be hypnotic.
Here's the must-know fingerpicking pattern:
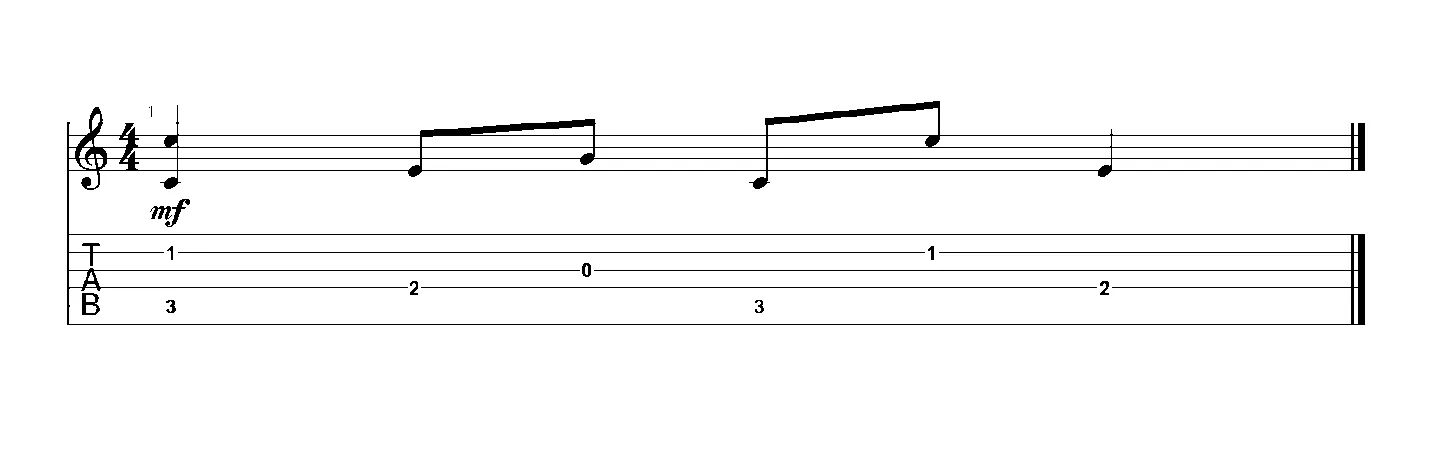
You'll have heard this pattern played by a wide range of artists from The Beatles to Bob Dylan.
It provides a great rhythm that never seems to want to stop.
Being able to play in this way is great for pulling out the guitar around the campfire or at the beach.
Picks are easy to lose, so being able to play with only your fingers is a great skill to have.
Pro Tip: Work on your finger calluses.
By now you've probably said to yourself, "My fingers hurt!"
Don't worry, this is normal.
Developing calluses on your fingertips is by far the most challenging part of learning how to play guitar.
Once you overcome this challenge, there will be nothing to stop you from learning how to play guitar at any level.
Bonus Step - 7th Chords
After practicing the above concepts for a few weeks you might want to broaden your horizon and see what else there is to learn.
Let's start doing that with more complicated chords.
The next chord type you should get under your fingers is the 7th chord family.
A 7th chord is created by adding a 7th scale degree to the major or minor chord shape.
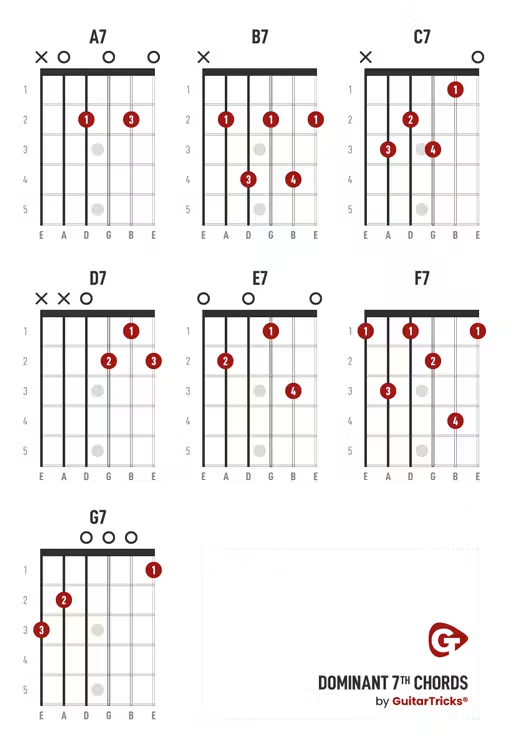
Let's start with Dominant 7th chords and Minor 7th guitar chords.
Dominant 7th Chords
Minor 7th Chords
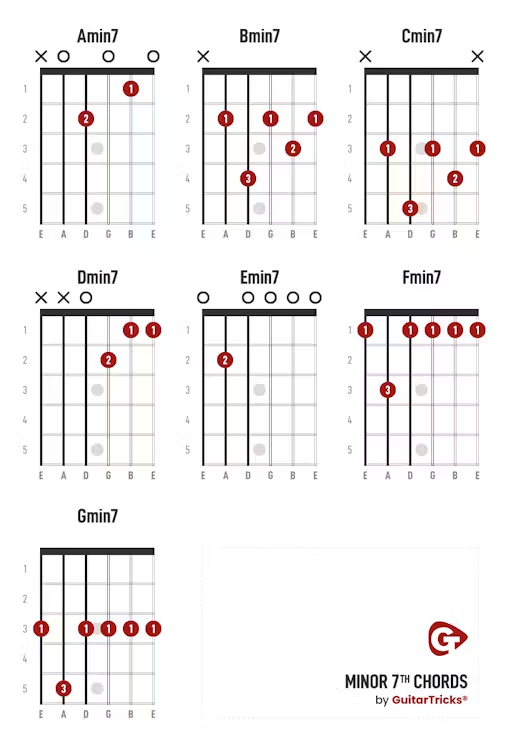
Understanding 7th chords will allow you to play a ton more songs.
They also add a lot of mood to your chord progressions.
To solidify your 7th chords, try this chord sequence with each chord:
Practicing this way will help you understand the multiple variations on each chord.
Don't forget your metronome!
Progress Check-In
All the curriculum we've covered will take you through to the end of the Guitar Tricks Guitar Fundamentals Course 1.
You can always double back and make sure you've mastered all the concepts above.
Even if you haven't gotten your barre chords completely clean, or if you still trip a little bit over your Pentatonic scale, it's totally ok to keep going.
It's important to stay excited and to have fun with your practice.
Sure, there will be off-days, but if you have too many off or dull days in a row you won't want to continue picking up your axe.
At this point, look back on all the things you've achieved.
Give yourself a pat on the back!
Some super famous guitarists have made an entire career on playing a few power chords, think of Nirvana!
As long as what you are doing brings you joy, you're progressing.
Remember – consistency is key.
If you can only get the guitar in your hands 10 minutes a day, that's better than nothing.
As with learning any skill, if it becomes a part of your regular routine, in your muscle memory and in your long-term memory, you'll be engraving these techniques and you'll remember them forever.
Keep Momentum and Inspiration – Don't Stop Now!
You've learned a lot so far!
At this point you'll know how to play guitar better than most.
The key to continuing on your guitar journey is to simply be sure to pick up your guitar on a regular basis and have fun with it.
Even if you don't sit down to run scales, try to at least strum through some chords or play some of the new songs you've learned.
It's important to keep up your muscle memory.
Learning how to play guitar is just like any skill, if you stop doing it you'll lose some of your ability.
But you don't need to shut yourself in and bang your head against the wall.
Keep your ongoing practice fun!
Find a friend to strum along with.
And playing along with Jam Tracks will help keep things interesting.
If you find yourself stuck, grab a Custom Lesson Plan so you can stay on track with your learning goals.
Feel free to reach out the Guitar Tricks Forum for answers to all of your guitar questions from other students within the program.
And while you're at it, sign up for a FREE 14-day trial to gain access to the amazing and detailed guitar lesson content that Guitar Tricks is famous for.
Learn how to play guitar today with the best online guitar lesson program on the market.
FAQ
You can start by learning a few basic chords, watching online tutorials, and practicing regularly. Apps and websites like Guitartricks.com are super helpful for beginners since they break down techniques into bite-sized lessons.
The 12 notes on a guitar are A, A#, B, C, C#, D, D#, E, F, F#, G, and G#. They repeat in the same order as you move up the frets on any string.
It depends! Guitar can feel easy when you focus on simple songs and consistent practice, but like any skill, it takes time and patience. The key is to enjoy the process and celebrate small wins along the way.
Start with learning how to hold the guitar, practice strumming patterns, and play a few easy chords like G, C, and D. Then, string them together to play simple songs— it's a great way to build confidence.
Strumming a simple pattern while playing two or three easy chords like E minor and A is probably the easiest place to start. It'll sound great without too much effort.
Place your fingers on the right frets according to chord diagrams, press firmly, and strum only the strings the chord requires. It's all about getting used to finger positioning and smooth transitions.
The five basic chords most beginners start with are C, G, D, E, and A. They're versatile and show up in tons of songs, so mastering these opens up a lot of music to play.
Focus on learning just a few chords and practicing songs that use them over and over. Using structured lessons, like on Guitar Tricks, can speed up the process by keeping you focused and organized.
"Knockin' on Heaven's Door" by Bob Dylan is a classic and super beginner-friendly since it only uses G, D, C, and Am. You'll be strumming and singing in no time!
Acoustic strumming is probably the easiest style to start with—it's straightforward and works well for popular songs. Plus, you don't need any extra gear to get going!