
Building a parts guitar is a very cool experience.
Being able to spec out your instrument with all the electronics and features you want is a cool way to learn what goes into making guitars.
In this article, we will go over the basics of building your own guitar, mainly with some things to keep in mind before you embark on this journey.
We will use the selection from AllParts to keep this easy and reference a hypothetical Telecaster-style guitar to give you an idea of some hurdles you might come across.
#1 The Brainstorming Process
The best way to go about this is to pick a body that has already been routed. That way, you can avoid having to get the guitar routed or having to route it yourself.
There are a few tools you will definitely need for the installation process. The biggest one I recommend is a Dewalt power drill – you will obviously need a variety of drill bits to mount various hardware parts.
To also make your life easier, don’t forget a set of digital calipers!
You will likely need a reamer for the tuning machine holes because they probably won’t be drilled wide enough.
The best thing you can do for yourself is to get all the parts and tools you’ll need before you begin.
And trust me, you might realize you missed a few things while you are in the middle of putting the guitar together.
Make a list of everything you will need, which will most likely include:
- the guitar body
- the guitar neck
- a bridge & bridge hardware
- tuning machines
- pickups
- a pickguard
- a neck plate
- a nut
- miscellaneous electronics components like 250k or 500k potentiometers, capacitors, a jack, a switch, etc.
- all screws and strap buttons
Now is the time to decide what the guitar will look like, and what color you want it to be, etc.
I suggest going with AllParts because the bodies are routed for cavities and already finished.
For fancier finishes and wood selection, you can go with a company like Warmoth, which might be more expensive and take some time to make.
Other things to think about are the kind of sound you’re going for (modern vs. vintage), the color of the hardware, and if you want vintage-styled hardware, etc.
This is undoubtedly why the brainstorming process is so important!
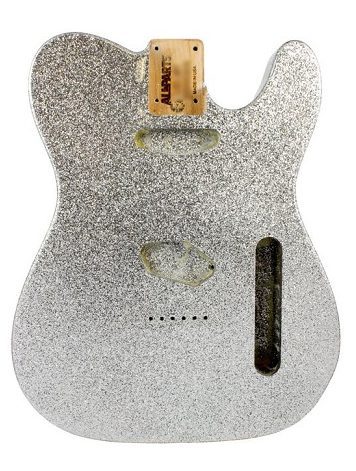
Who doesn’t enjoy a good Sparkle Tele?
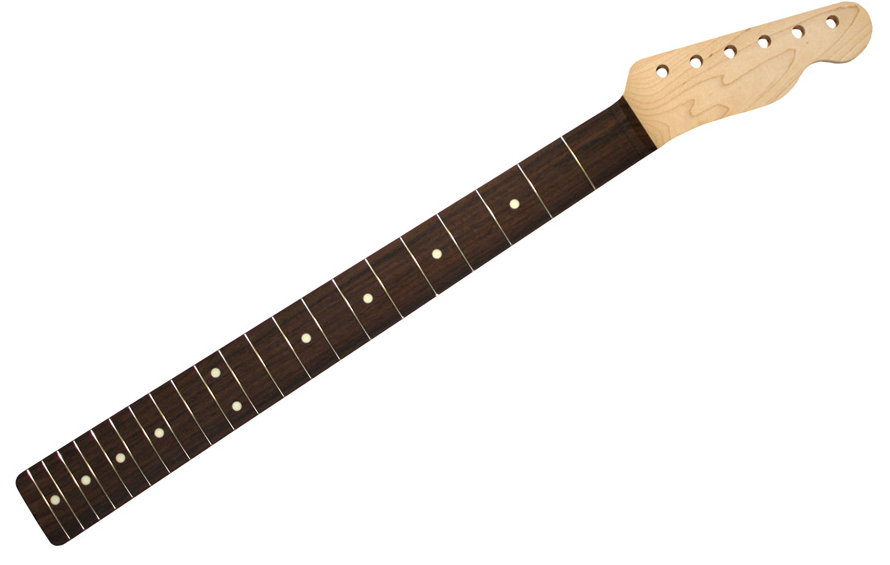
For this article’s purpose, we will reference assembling a silver sparkle Tele-style body with a Rosewood fretboard / maple neck.
For the neck, you’ll need to make some decisions about what kind of neck you want. I chose a modern style neck with 21 .051”x.079” sized frets, a 10” radius and a nut width of 1-5/8”.
There are a bunch of articles out there about what radius to pick, what fret size to use, etc. so do your research to find which one works best for you.
You could also pick a neck based on a guitar you already own, measuring the neck profile and fret size and go from there.
I also am choosing a black 3-ply pickguard (meaning the pickguard is layered) with a modern 8-hole profile.
Don’t forget that Strat-style + Tele-style necks are generally not the same!
For electronics, the sky is virtually the limit.
To make it simple, I went with a Quarter Pound set I know sound good from Seymour Duncan.
My recommendation is to listen to a lot of pickup videos on YouTube to find what works best for you.
Seymour Duncan also has a wealth of wiring diagrams on their website to help you through the wiring portion of the build.
And guess what – if you have questions, feel free to reach out to the pickup manufacturer that you are curious about. They are generally happy to help!
#2 The Assembly Process
Now you have to put the whole thing together!
If you want the moving pictures version of building a guitar, Guitar Tricks Full Access members can reference this video tutorial.
It can be difficult if you don’t already have all the parts and tools that you need so here’s a friendly reminder to go back to the Brainstorming Process and re-read it again.
If you bought passive pickups, now is the time to add any shielding to the cavities to protect the electronics from unwanted interference.
What you might find easiest first is to install the pickups to the pickguard, then the pots and switch to the control plate.
Be sure when you are soldering (if it’s your first time) to tin and collar (with heat shrink) your wires that will make contact with the soldering points and make sure the solder is a nice, bright silver sheen (it should not look dull).
You may benefit from something like a Helping Hand. Don’t forget to take your time, go slow and be careful with the soldering iron so you don’t burn yourself.
If everything installs successfully, plug an instrument cable from the jack to an amp. Gently tap on the pickups with a screwdriver – they should create an output that you can hear out of the amp.
If they don’t, it’s back to the drawing board.
Oh, and because someone will definitely ask, I prefer Orange Drop capacitors because they sound great but there are a wealth of capacitors out there that you can choose from and all sorts of articles about why some are better than others.
Something else to consider is the nut.
Arguably, the best guitar nuts are made out of bone and by hand. If you are feeling adventurous, check out this guide by StewMac on how to make your own nut.
For those wanting to revisit that later, StewMac also makes pre-slotted bone nuts, but you will still have to properly slot the nut for the string gauge you are using.
Once again, this is an area of some complexity and nut slotting files are not cheap.
The end result is often one the maker can truly be proud of, however, so if you are feeling up to it, try making one from scratch! Actually, try making two because the first one will most likely be your tester.
Another thing to consider if you purchased an unfinished neck is potentially gunstock oiling the back of the neck (you’ll notice our hypothetical Tele-style neck referenced is unfinished).
Use Birchwood Casey Tru-Oil and apply several coats over the span of several weeks to coat the back of the neck, using a fine steel wool to sand it back before proceeding again.
The more coats you add, the more the shiny the neck will become and will also be protected from the oils on your hands.
Don’t forget to soak the oiled rags in water & hang them dry after application & before disposal – after being applied with oil, they become extremely flammable!
You can also just coat the back of the neck and headstock with a few coats and call it a day.
The finishing process is delicate and can take many weeks, depending on your desired outcome.
One by one, you will need to attach all the hardware.
The neck should be attached last but you may have to place it temporarily in the neck pocket to make sure that it lines up correctly with the bridge.
Don't force it into the neck pocket; if it's too snug, take some fine sandpaper to the sides to allow it to fit more properly.
The most important thing I can recommend for mounting the hardware is to go slow and measure everything three times before you drill, ESPECIALLY with the tuning machines.
A good rule of thumb is to mark the point you are going to drill before you drill it, after measuring where it needs to go.
Perhaps this point seems moot, but nothing is worse than getting all your tuning machines on to find that one was off and now the whole set needs to be re-drilled!
Line them up with a straight edge first. Give yourself plenty of time.
At last, you are ready to put the neck on! Suddenly the guitar has strings. You are so close to playing it, surely you must be done…
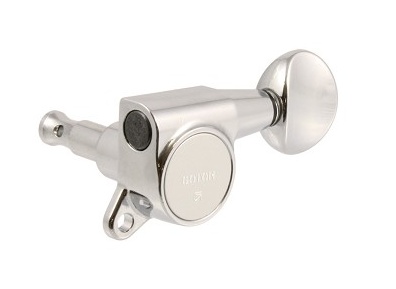
Tuners like these Gotoh mini key ones are hard to cover-up if you drill them incorrectly – measure measure measure!
#3 The Setup Process
But for some reason, the strings are ridiculously high off the fingerboard when you measure them with a string action gauge, and the intonation after the 12th fret is sharp.
What to do?
The second most important part of building a parts guitar is setting it up afterwards.
Necks are not built with the couple hundred pounds of tension that strings provide, so even our brand new hypothetical Tele-style neck could cause fret buzz if the fret plane isn’t true.
If you are dedicated to doing the set-up yourself, now is the time to research the process, which can be lengthy and guess what? It requires more tools.
Here is a guide from SF Guitarworks on the basics of setting up your guitar but be sure to check out StewMac as well.
This is an area where many introductory parts guitar builders will take their finished guitar to be set-up by a pro so don’t feel like it’s completely out of your league or you’re in over your head.
There’s also a possibility (alluded to above) that the guitar might need fret work to have the action set nice and low with no string buzz.
This is a common element of building guitars, and one you should prepare yourself for.
Doing fretwork will require more tools, more time, and is a process that requires some knowledge of what a good fret job should look like.
StewMac also carries a book about the process here.
Another idea is to pick the brain of your local luthier and see if they have any tips for you.
Great fretwork is a craft on its own, one of which many technicians worldwide are known for specifically.
#4 The Playing Process
Not only my favorite process but the favorite of many, it’s time to strum a few guitar chords on your brand new guitar.
This process is just as important as the others and for good reasons:
#1) you want to make sure everything performs properly and stays in tune
#2) you should enjoy the fruits of your labor
Trust me; I know the few paragraphs I wrote on this subject don’t even tip the iceberg of what you just did to put this guitar together.
Likely, there was blood, sweat and tears that went into crafting this guitar. But you did it! And there the guitar is.
You might start to think of guitars in an entirely new light after putting one together yourself. Or you might decide that building is not for you and you prefer shredding guitar scales on a guitar that’s already been built for you.
Either way, it’s an important rite of passage for a musician to see what goes into putting a guitar together and you have accomplished just that. Congratulations!
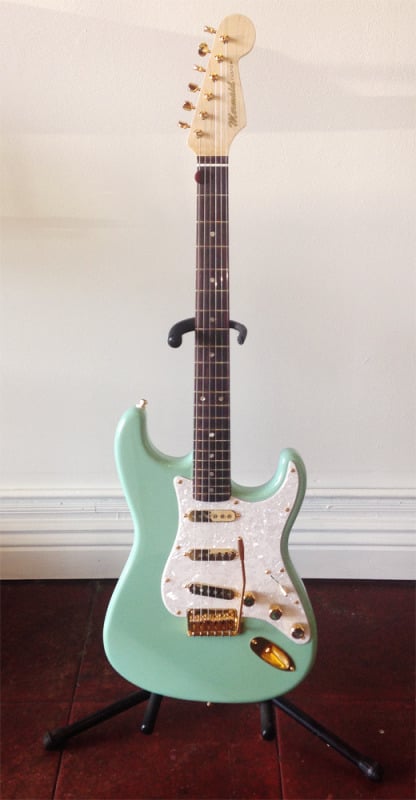
For fun, here’s a photo of my first parts guitar, the Mermaid Strat. This guitar was put together entirely out of parts from AllParts, Seymour Duncan, Q-Parts (for the knobs) and StewMac.
Monique Hernandez-Fuentes is a Bay Area musician, YouTube technician host for EMGtv and writes for GuitarTricks.com.