Introducing the A Major Chord
Now we are ready to learn our first full chords for the guitar. This tutorial assumes your guitar is in tune and you have acquired the ability to play open string notes as well as fretted notes.
In music, a Chord is defined as a group of three or more notes that are played together at the same time. We will start with learning the basic Open String Chords in the first position. These are called Open String Chords because they make use of as many open strings notes as possible.
We will start with the most basic way to play a full A major chord, D major chord, and E major chord. In this first lesson we are going to play an A major chord.
As with all chords in this tutorial series, place your index finger first, then middle, then ring, then pinky. Some chords do not require use of all fingers. This doesn't change the idea that the best way to stay organized is to start with your index finger, then move on.
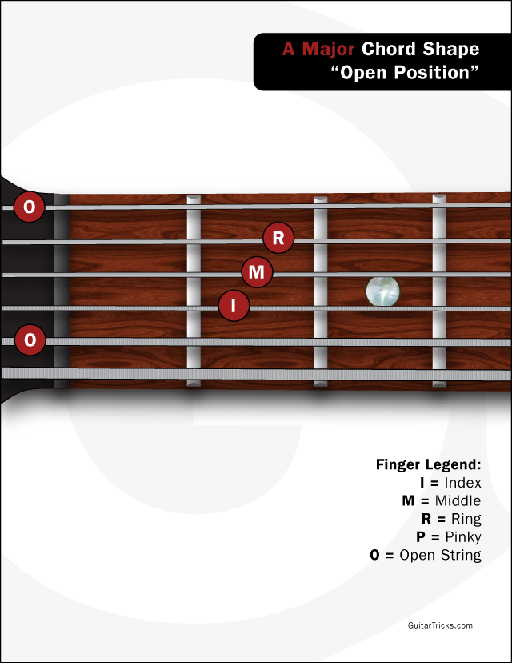
For the A major chord, place your index finger on the second fret of the D string. Then place your middle finger on the second fret of the G string. Then place your ring finger on the second fret of the B string. Normally we want each finger to be as close to the fret as possible. In the case of the A major we have to slant our fingers slightly in order to fit all of them in the available space.
Some of the notes are "open" string notes. In this case, make sure to keep your fingers clear of that string so you don't mute it. You want to have your hand
"hovering" or "arched" slightly over any string that has an "open" string note. Some of the notes are "fretted" notes. In this case, place the tip of the
appropriate finger right behind the appropriate fret. It is important to use the tip of your finger. Beginners find their fingers can be tender &
occassionally are tempted to use the pads of their fingers. With time (and dedicated practice!) your fingertips will harden with callouses. Until then,
tough it out! You can do it! It is worth it!
From the last knuckle of your finger to the fingertip, arch your finger so it is pointing straight down into the string & fretboard. This will give you the most leverage & power. In addition, your fingertip should be right behind the fret you are playing. Not on top of the fret! You will
get a muted sound right on top of the fret. Also, not too far behind the fret. In that case you won't get enough leverage & you will be making it too hard on
yourself. Right behind the fret is the best location for any fretting any note!
Your thumb should be placed directly opposite your fingers on the back of the neck. You thumb should provide just enough pressure to keep your hand firmly
in place on the neck and opposing pressure to help your fingers hold down any fretted notes. Sometimes beginners squeeze too hard with their thumb
and, or their fingers. Actually this is a problem for some skilled guitarists, too! Remember that you want just enough pressure to get the job done. Not enough will, of course, result in a poor sounding chord. But too much will is wasted effort and can over time actually hinder your ability to move quickly and effectively to the next chord or hand position.
First, get the notes of these beginning chords to sound. After you can do that, start to experiment with exactly how much pressure you need in
order to play fretted notes and chords.
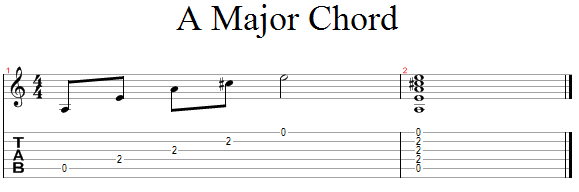
We want to practice playing each chord using two different approaches. We want to individually pluck each string slowly right after one another. This will give us a way to hear whether or not every note in the chord is sounding as clearly as possible. After you've made sure that each note is sounding as clearly as possible, then we want to strum the chord, lightly grazing the pick over each string quickly right after one another. This is typically
how chords are strummed on the guitar. Once you get used to this technique, try to strum back and forth.
Instructor
Christopher Schlegel
- Styles:
- Any Style
- Difficulty:
-